by
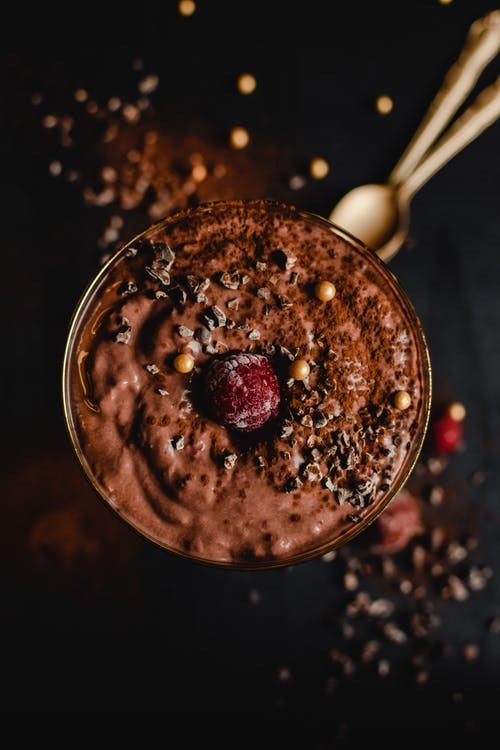
by Food photography styles can often be divided into two categories. Most photographers prefer photographs that are bright and airy or dark and brooding. Soft lighting and well-lit subjects are common in bright and breezy pictures. This is the most popular type since it allows you to see all the food’s components. Dark food photography, on the other hand, has a painterly quality.
It elicits strong emotions as well as a strong desire. The Chiaroscuro technique is used in moody food photography. It’s an Italian phrase for the difference between light and shade. It can be found in many paintings, including Vermeer and Caravaggio.
Bright and airy images are, for the most part, simple to deal with. On the other hand, dark and sombre photography demands far more control and technique. It’s advantageous to be able to photograph in both ways. When shooting commissioned work, this is especially true.
Backgrounds
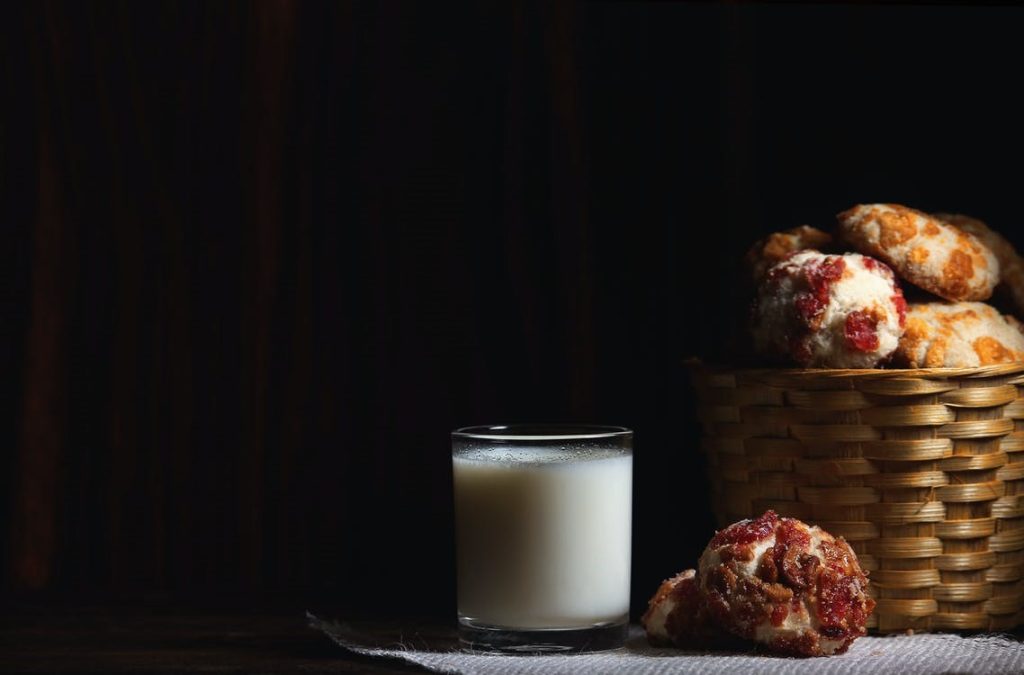
When photographing dark food, avoid using bright and glossy backdrops. They’ll stick out and may cause your audience to become distracted. You can use anything from slate to speckled cookie sheets as a dark photography background. Just make sure anything you choose isn’t gleaming. The fundamental principle behind current food photography trends is to focus readers’ attention on the main item while keeping the surrounding in darkness. As a result, you should use muted surfaces, dark props, and dark backgrounds.
Dark blues, dark grey, and black are good choices for dark food photography backdrops. However, you can experiment with different tints, such as strong espresso tones. Feel free to utilize textured backgrounds as well. Placing them in your setting will help enhance the appearance of the food. Both for backgrounds and props, wood is terrific, grained material. It’s simple to work with and gives off a rustic vibe.
Minimal Lighting
Moving further away from your window is the key. This instantly reduces the amount of light hitting your topic. It also helps if you’re shooting in a dark room. Use thick drapes to darken the set if too much light is pouring in through the window. We all know how crucial shadows are in food photography, but if our shot is too dark, underexposed, or lacking tonal range, we risk losing our shadows as well. As a result, our subjects’ amount of dimension and depth may be reduced. You don’t have to go overboard with the strong contrast, but having something in the frame of importance with brighter tones is an excellent idea.
Only enough light should be allowed to illuminate your subject. Backlight your subject to increase the chiaroscuro effect. It not only generates dramatic lighting but also highlights the food’s texture. Backlighting, as the name implies, entails illuminating your subject from behind. As a result, your light source must be positioned behind the meal. One of the most crucial camera settings for food photography is ISO.
Depending on your camera’s capability, choose a minimum value of 50 or 100. It will allow you to snap a high-quality photo free of grain caused by a lack of light. The diffuser works as a window, allowing the mono light’s flash to be softened. The end effect should resemble images taken in natural light. Artificial lights, like natural light, can be used for backlighting.
Bounce Cards and settings
Using little black fill cards is the key. Cut black cardboard or poster board into squares to produce fill cards. Then, position them where you’d like to see more shadows. Just make sure they’re not in the picture. You won’t mistakenly include them in your image this way. Rolling up pieces of black poster board and stapling the ends together can also hide the light. After you’ve finished, you can use them to create a fence around your set. Fill cards assist in reducing lighting. They tend to prevent light from bouncing back onto the food because they aren’t reflective.
The necessity of a correct aperture is emphasized in every mystic light food Photographies. You should choose an aperture of f/5-f/7 or even higher. It makes no sense to blur the background, which is dark in dark food photography and difficult to detect according to the original concept. Keep in mind that while this setting will not add to the mystery, the finely rendered space may. As a result, it may not have a favourable influence on the frame in low light.
Spotlighting and bounces
You should slant it away from the object and aim it toward the surrounding black absorbing surface. On one side of the thing, a contrasting shadow can be generated in this manner. The other can be slightly brightened, with food as the primary focus. Bounces come in various shapes and sizes, but the only difference between them and spotlights is that the light source is now focused on the item rather than the absorbing reflector.
Using this strategy, you may obtain better illumination of the primary product in the photo. This strategy can be used if more excellent illumination is still required for the specified composition, but you do not want to abandon the idea of dark cuisine entirely.
Light bounces can be placed on any side of your subject. As a result, light bounces back and forth between them, reducing shadows and brightening the background and foreground. Incorporating highlights into your dark food photos is the most straightforward approach to adding bright tones.
You should be able to view your histogram in decent lighting to check that the tonal range you’re capturing includes some highlights. In dark food photography, it’s critical to experiment with highlights in post-production to add interest. Of course, it isn’t appropriate for all objects, and it frequently necessitates compensating for deep shadows in the front. This task is made easier for me by using a reflector. The second light source is more effective the larger it is.
Non-Reflective Props
In food photography, dealing with reflections can be difficult. It isn’t easy to get rid of them while making chiaroscuro photos. Use props that don’t reflect light as much as possible, if possible. Because porcelain and China are brilliant and dazzling, could you not use them to decorate your cuisine? Work with matte dishware in neutral tones instead. You could also look for patinated vintage tools and props.
They appear to be exciting and will not reflect light and new ones. The lenses used for high contrast food photography are a matter of personal preference. The lenses with a 50 or 80 mm focal length are ideal for professional food photography. The equipment allows you to play around with depth of field, capture crisp images, and create a lovely bokeh effect.
Rule of Odds
Include a handful of supporting components in your photo together with your main subject. These things should be of different sizes to balance each other out. The Rule of Odds is how professionals refer to this strategy. It entails placing many props in regions that intersect the Rule of Thirds grid’s intersecting lines. The name Odds refers to the grid’s ability to have anywhere from three to five focus points.
Remember that the core subject must take precedence over the supporting elements. However, you should avoid making your major focal point too evident. If you do, the viewer’s interest in the rest of the image may wane. As a result, you must strike a balance between all of your image’s focal points. If you leave enough negative space in your food photo, it will assist a lot.
Dark Effect
It’s a good idea to slightly underexpose your photo in the camera while shooting dark food photography. By its very nature, Chiaroscuro tends to make the image more contrasty. One or two stops underexpose your shot. This preserves the details while avoiding the risk of blowing out highlights and shadows. Working with a tripod is recommended, especially if you’re shooting in natural light. Don’t increase the ISO because you’ll end up with annoying image noise.
To acquire the correct exposure, utilize a slow shutter speed. In dark food photography, the primary goal is to reduce the amount of fill light reflected around the subject. Any light-reflecting white or bright objects and filling a shadowy area in your scene qualifies as the fill light. Long exposure allows you to properly expose your food photographs as long as you have adequate light.
Photos and Post-Processing
In post-production, your moody food photographs take on a life of their own. It’s where you bring your underexposed photos to get them to the proper exposure levels. To improve the appearance of the meal, concentrate on colour treatment. Even if you underexpose in the camera, the final image should not be black all the way through. Keep the food in your photograph bright so that the viewer’s attention is drawn to it. When brightening your moody food shot, use both global and local edits. If you increase the exposure of the entire image, your shadows will become flat.
When making modifications, avoid using saturation sliders if at all feasible. Instead, use Lightroom’s or Camera RAW’s brightness sliders. This allows you to brighten the colours independently. Because you won’t be utilizing white dinnerware, you can get creative with white balance and hue.
Experiment with the tones your photographs produces to find what works Split-toning can also be used to significant effect. Of course, as long as it’s done with delicacy. Your melancholy food photographs will have a three-dimensional effect if you use a mix of warm and cool tones. All food photography tips include keeping the food bright but not completely dark in the frame.
It will easily aid in the improvement of the image. Adjustments might be made on a local or global level.
Excessive exposure should be avoided. Otherwise, your shadows will be flat. Use the brightness sliders in Camera RAW or Lightroom to brighten colours separately. Saturation sliders, on the other hand, necessitate significant knowledge and practice. Because you won’t be using white tableware, you may be more creative with the tint and white balance.
check out this nice dark food photography YouTube video
Create Stills
Make a still life composition by emphasizing the principal piece and elevating it above the others. You can also decorate the table with fruit, flatware, books, and various light materials. Shoot the process of making tea with boiling water. This will add movement to the photo and make the tea more enticing to the viewer. Photographing a group of pals having supper can result in fascinating dark food photographs.
It is possible to arrange the components in a straight line in moody food photography, in addition to placing them on a dark background. Place ready-made meals, accoutrements, and tableware near vintage chairs to create a “live” frame. Take a photograph of breakfast or dinner on a dark dish, focusing on a single element. For example, in this case, the attention was on a doughnut, and everything else can become a fuzzy background when viewed from a particular perspective.
Food photography that is dark and melancholy might be difficult. Unlike bright and airy photography, it takes extensive planning. However, to advance as a photographer, you must be willing to acquire new approaches. You may achieve just that by using chiaroscuro photographs.
So, give it a shot and see what you can learn from it. You’ll be surprised at how simple dark food photography is once you understand the fundamentals.